Thursday, February 23, 2017

Amazon Lex Speech Permissions

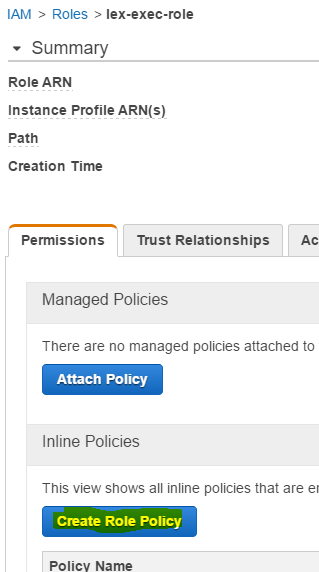
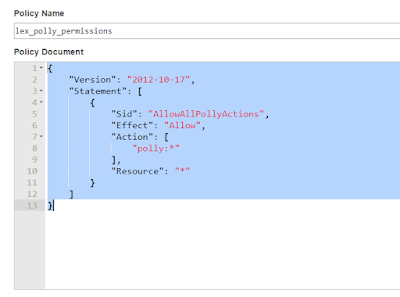
If you are planning to include speech recognition features in your Amazon Lex enabled chatbot you should add a specific policy to the role against which you are executing your command .

Basically you need to give rights to Amazon Polly to your specific role .


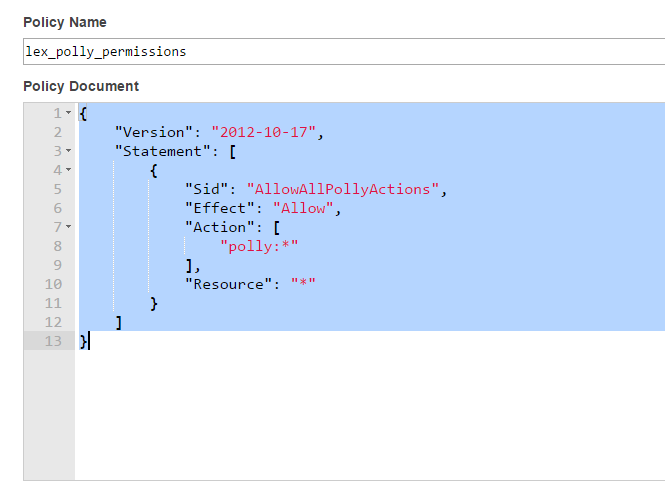
The screenshot below shows what you need to add.


Content:

{
    "Version": "2012-10-17",
    "Statement": [
        {
            "Sid": "AllowAllPollyActions",
            "Effect": "Allow",
            "Action": [
                "polly:*"
            ],
            "Resource": "*"
        }
    ]
}

Wednesday, January 11, 2017

ElasticSearch , Logstash , Kibana and Filebeat with Docker

When you have a number of containers in your DevOps infrastructure running you might need at some point in time to monitor the logs from your container managed apps .

One solution which  works ( at least for me ) is by using ElasticSearch , Logstash , Kibana or also called ELK  , to capture and parse your logs whilst having a tool like Filebeat which actually monitors your logs from Docker containers ( or not ) and send updates across to the ELK server.

I have created a github repository with my solution using ELK + Filebeat and Docker , have a look at the guide around how to setup :
https://github.com/javedgit/Docker-ELK

Monday, January 09, 2017

Install docker in 2 commands on Ubuntu

Simpliest way I found to install docker on ubuntu :

1. wget -qO- https://get.docker.com/ | sh 
2. sudo usermod -aG docker $(whoami)

Then logout and login back to your terminal .

Execute docker ps to see if docker is installed correctly.

Friday, January 06, 2017

Automatic Install of Maven with Jenkins and use within Pipeline

Assume you want a specific version of  Maven to be installed automatically when doing a build e.g because you need to have a build executed on a remote node.

This is what you need to do to perform this :


  • Define your Maven tool within the menu Jenkins > Manage Jenkins > Global Tool Configuration page
    • Click on Maven Installations
      • Specify name for your maven 
      • Specify maven home directory e.g /usr/local/maven-3.2.5
      • Check the Automatic install option
      • Choose Install from Apache e.g maven-3.2.5

  • Make sure that you Jenkins has access to install Maven within your maven home directory by executing the following command (on your slave ):
    • sudo chmod -R ugo+rw /usr/local/maven-3.2.5


  • Now you can use maven in your Jenkins pipeline using a command such as :
withMaven(globalMavenSettingsConfig: 'maven-atlas-global-settings', jdk: 'JDK6', maven: 'M3_3.2.5', mavenLocalRepo: '/home/ubuntu/.m2/repository/') {
   
           sh 'mvn  clean install ' 
            
        }

Note that you can use the Pipeline Syntax helper to fill the options you want to use with Maven .

Thursday, January 05, 2017

Publish Docker Image to Amazon ECR

If you are using an Amazon AWS chances are that you already have ECR , Amazon EC2 Container Registry , within your account . Now this is practical if you want to have you own private Docker Registry for saving your docker images .

Now in my case I wanted to be able to push an image to my private Registry within the context of a Jenkins build .

So we will need to do the following  :

  • Configure AWS credentials on build machine
  • Configure Amazon ECR Docker Registry
  • Modify our Jenkins pipeline to perform a push 


Configure AWS credentials on build machine

1. install the awscli which allows you then to configure your aws account login info on your env , this is done using :

sudo apt install awscli

2. next we do the aws configuration using the following command, ( see AWS CLI official guide  ):

aws configure

Here you will need to know your AWS Access Key ID and AWS Secret Access Key .

Note that the Secret Access Key ID is generated only once , so you need to keep it somewhere safe or regenerate a new one .

To get the 2 keys you would need to login to your AWS console and go to :

IAM > Users > Now select one of the users > Click on Security Credentials tab >  Now from here you can create a New Access Key 


Configure Amazon ECR Docker Registry

1. Login to your AWS console  .
2. Choose "EC2 Container Service"
3. Click on Repositories > Create Repository
4. Set a name for your repository 
5. Clicking on next will give you all the commands to login to ECR from aws cli , tag and push your image to your repo

For reference the official link to ECR is here .


Modify our Jenkins pipeline to perform a push

 Now that we have aws login configured on build machine and a private docker registry on Amazon we are ready to modify our Jenkins pipeline to perform the push .

Here I assume that you already do have Jenkins job existing and you know your way through the pipeline goovy codes .

So we will add the following :

{
....
}
stage('Publish Docker Image to AWS ECR '){
       
        def loginAwsEcrInfo = sh(returnStdout: true, script: 'aws ecr get-login --region us-east-1').trim()
        echo "Retreived AWS Login: ${loginAwsEcrInfo}"
        
        sh '${loginAwsEcrInfo}' 
        sh 'docker tag tomcat6-atlas:latest XXXXXXXXXXXX.YYY.ZZZ.us-east-1.amazonaws.com/tomcat6-atlas:latest'
        sh 'docker push XXXXXXXXXXXX.YYY.ZZZ.us-east-1.amazonaws.com/tomcat6-atlas:latest'
       
   }

Note: Do replace the tag and push command with the actual values as indicated from your Amazon ECR repository page

Notice that I have a loginAwsEcrInfo variable defined in grovy , this is because I need to get the output of the command ' aws ecr get-login --region us-east-1 ' from sh which actually generates the command to login through docker using the aws credentials . This is possible thanks to the returnStdout flag on sh .

That should be it , you should be able to publish your image within your Jenkins job execution .


Wednesday, January 04, 2017

Linking Containers together using --link and Docker Compose

Right now I am working on a project where :
- there is a need for the tomcat instance to connect to an Oracle instance .
-  Both of these run in docker containers
-  I consider the Oracle instance to be a shared docker service , meaning it will be used by other services than the tomcat instance and that I do not want to tear it down as regularly as the tomcat docker instance

I would first need to build an image of my webapp with tomcat6 using a command similar below :

docker build -t tomcat6-atlas .


Then typically i use the following commands to run my docker image for tomcat:

docker run -it --rm --link atlas_oracle12 --name tomcat6-atlas-server -p 8888:8080   tomcat6-atlas

This tells my docker that I want to :

  1.  run an image of tomcat6-atlas as a container 
  2. the alias name of the container should be tomcat6-atlas-server using the --name flag
  3. the port 8080 on the container should be mapped to 8888 on the host using -p flag
  4. and that i should link my atlas_oracle12 container which is already started ( check this blog entry )  to this tomcat6-atlas-server container that am firing using the --link flag . 
The --link flag is important because using this , I can specify for exampled the JDBC connection from my app in the  tomcat6-atlas-server container to point to the atlas_oracle12 container using the alias name directly instead of having to use some ip addresses ( which may change if I restart the oracle container ) .

You could actualy ping the atlas_oracle12 container from the tomcat6-atlas container just by doing ping atlas_oracle12  , you dont need to therefore know the ip address of atlas_oracle12 as long as you name what is the alias name of the container .

Docker Compose 

Now typically the above is great if you have a small project but assume that the tomcat6-atlas container had numerous dependencies with other containers then it the command quickly becomes quite volumetric and possibly error prone.

Here comes Docker Compose which simplifies the build and the run of the container using one yml /yaml file as shown below:


version: '2'
services:
    atlas_tomcat6:
      build: .
      build:
        context: .
        dockerfile: Dockerfile
      image: tomcat6-atlas:latest
      
      network_mode: bridge

      external_links:
        - atlas_oracle12
   
      ports:
        - 8888:8080
      privileged: true
      
This is typically written in a docker-compose.yml file and you need to also install Docker Compose

Important things is that :
  1. It specifies the name of the project as atlas_tomcat6
  2. It assumes that in the same location as the docker-compose.yml file there is a Dockerfile to perform the build
  3. It knows thats the name and tag of the image is 'tomcat6-atlas' and 'latest' respectively
  4. With the network_mode:bridge value it understands that instead of creating a seperate network for the docker compose triggered instance of the container that it needs to use the default network of the host bridge , that is it will be able to connect to atlas_oracle12 ( container which was not started by docker compose )
  5. Containers on which atlas_tomcat6 has a dependency on but triggered seperately are defined with external-links tag e.g atlas_oracle12
  6. ports tag specifies the port mappings
I can build an image for tomcat6-atlas using the command :

docker-compose build


Now all you need to do is to fire up docker-compose using :

docker-compose up

Note that if the previous build command was not executed as part of the up command the image would first be built and then started.

If you want to run this in the bakground then you an use the -d flag :

docker-compose up  -d

To shut down your containers just use :

docker-compose down 

Portainer for visualizing your docker infra

So after having played around with shipyard  I decided to give Portainer a try . The reason why I wanted to look at Portainer as it gives you much more information around your Docker infra than shipyard does.

Below is a screenshot showing the features within shipyard:


You can see that it has information around containers , images , nodes and registries and that pretty much stops there.

In comparison Portainer provides much more level of details :


The thing that interested the most was the Networks section as I was trying to figure out how to connect a docker-compose tiggered container with a shared container which was not launched through docker-compose.

Installation Portainer :

- You need as pre-requiste to have docker and  docker swarm installed
- Official installation instructions are here 
- Then just execute the following command to install the Portainer container ,which will be exposed on port 9000 :

docker run -d -p 9000:9000 portainer/portainer

Note that am assuming that your running on ubuntu /linux

To run portainer on a local instance of the docker engine use the following command :

docker run -d -p 9000:9000  -v /var/run/docker.sock:/var/run/docker.sock portainer/portainer

Endpoints

You an have multiple endpoints configured such as you are monitoring diferent remote instances :
- make sure that inbound ports are opened on your remote endpoints (e.g 2375 )
- if you run Portainer locally to your docker containers , there is a recommended setting to be changed or just provide the public ip addr. of the docker host 

Thursday, December 29, 2016

Install Shipyard to monitor Docker Containers

So far I have a number of containers on my ubuntu box , looked at the easiest way to manage them all and gave shipyard a try .

There are 2 ways to install shipyard both involve (without any surprise) to make use of docker containers.

I have tried the manual install as it gives me more flexibility . The link to the installation is found here . This comes as a number of docker images to run .

The key thing to bear in mind is that wherever you see <IP-OF-HOST> you need to add the actual public ip address of the docker host .

Below are some examples of where the swarm manager and agent ask for the <IP_OF_HOST>

docker run \ -ti \ -d \ --restart=always \ --name shipyard-swarm-manager \ swarm:latest \  manage --host tcp://0.0.0.0:3375 etcd://<IP-OF-HOST>:4001

docker run \ -ti \ -d \ --restart=always \ --name shipyard-swarm-agent \ swarm:latest \  join --addr <ip-of-host>:2375 etcd://<ip-of-host>:4001

Do not put localhost as this IP address else you will not be able to view containers on the docker host .

Also you can configure the port on which your shipyard WEB GUI is accessible by changing the port number below highlighted in yelow i.e 7777

docker run \ -ti \ -d \ --restart=always \ --name shipyard-controller \ --link shipyard-rethinkdb:rethinkdb \ --link shipyard-swarm-manager:swarm \ -p 7777:8080 \ shipyard/shipyard:latest \ server \ -d tcp://swarm:3375

Tuesday, December 27, 2016

Oracle 12c setup using Docker on Ubuntu

Recently had to install Oracle 12c on an ubuntu 16.04 server  , the quickest way I found to do that was through docker .

Pre-requisites

First things first we need to setup docker and this is done by following the docker docs :
 https://docs.docker.com/engine/installation/linux/ubuntulinux/


Installing Oracle Image 

Now that you have a working docker install you need to :

  1. Download the image for Oracle 12c 
  2. Open port 8080 and 1541 such as you get access to the web Application express interface and are able to connect to the Oracle instance via SQLPlus respectively
  3. Map a source directory on your docker host with a directory within the Docker Oracle container should you want to import dumps for example
All the above can be achieved within the command below :
docker run -d -P --name atlas_oracle12 -p 8080:8080 -p 1521:1521  -v /home/ubuntu/atlaslocaldump:/u01/app/oracle/admin/xe/dpdump/ sath89/oracle-12c  

Things to note are that :
  1. atlas_oracle12 - this is the name I have given to my container , it can be any valid name e.g foo 
  2. /home/ubuntu/atlaslocaldump - this directory on my docker host which i want to make visible within the oracle docker container ( so basically the source )
  3. /u01/app/oracle/admin/xe/dpdump/ - this is the directory on the docker container from which i will be able to access the files within /home/ubuntu/atlaslocaldump 
  4. sath89/oracle-12c - this is the name of the image for the Oracle-12c install , you can get more information around this here on docker hub  .
  5. Also it takes around 10-15 mins depending on your machine to initialise the Oracle instance so you might not just be able connect straight to SQLPlus .. give it some time to initialise
SQLPlus

So once the DB is up and running you might want to access the Oracle instance via SQLPlus , to do that you can either install SQLPlus on your docker host and connect or you go within your Oracle container and access the bash , I have done the later as installation of SQLPlus client on Ubuntu was a completely nightmare .

So connect to the oracle container using the following command :
docker exec -it atlas_oracle12 bash 

 Note that atlas_oracle12  is the name of the container that you defined in the docker run command above if this is not the name of the container then change it to reflect your own container name.

Now that we are within the container SQLPlus can be called using :
$ORACLE_HOME/bin/sqlplus system/oracle@//localhost:1521/xe.oracle.docker

Importing a Dump

You can also import a dump using the following command :

$ORACLE_HOME/bin/impdp USERNAME/PASSWORD@//localhost:1521/xe.oracle.docker dumpfile=myDumpFile.dmp  logfile=myLogFile.log table_exists_action=replace schemas=mySchema 
Do change the values above to correspond to your specific settings

Removing the  Oracle Container

For some reasons you might want to remove the oracle container in our case it is named atlas_oracle12 ( change this below to the name you gave your container instance )

To do that you need to stop the contained using command :

docker stop atlas_oracle12

Then remove the container directly using :

docker rm atlas_oracle12

You can check that the container is removed by doing a :

docker ps


Sunday, November 13, 2016

Truffle and Ethereum - call vs transactions

After banging my head for 4 hours trying to figure out why my sample Dapp doesn't actually save (persist) data to my contract I found out that i was actually making a call instead of executing a transaction .

What's the difference between a call and a transaction you say ?

- Well a call is free ( does not cost any gas ) , it is readonly and will return a value
- whilst a transaction costs gas , it usually persists something and does not return anything

Please read the "Making a transaction" and "Making a call" section in the offical lib:
https://truffle.readthedocs.io/en/latest/getting_started/contracts/ 

Say for example in your app.js of your truffle app you have a fictionious setComment and getComment function ( to persist and retrieve comments respectively ) this is how they could look like :

===Extract app.js====================

function setComment(){

 // Assuming your contract is called MyContract
  var meta = MyContract.deployed();

//Taking a comment field from page to save 
  var comment = document.getElementById("comment").value;

// Note that the setComment should exist in your MyContract
  meta.setComment(comment,{from: account}).then(function() {

    setStatus( "Tried to save Comment:" +comment);
  }).catch(function(e) {
    console.log(e);
    setStatus("Error saving comment .. see log."+ e);
  });
}


function getComment(){
  var meta = MyContract.deployed();

 // notice that in the readonly getComment method that after method name a .call is used
// this is what differentiates a call from a transaction
  meta.getComment.call({from: account}).then(function(value) {

    setStatus( "Comment:" +value);
  }).catch(function(e) {
    console.log(e);
    setStatus("Error retrieving comment .. see log."+ e);
  });
}

=============================


Wednesday, November 02, 2016

Ethereum Blockchain Simple Contract Example

This article is about how to get started with creating and deploying a really basic smart contract on the Ethereum network using the Truffle development environment and some solidity scripting .

Solidity is the language in which the contracts are writing its pretty simple enough but lets make some small steps against which then we can build more complex scenarios.

Assumptions :


  • We are deploying to an Ubuntu env. , although the commands could be adapted to whichever environment your using 
  • We are starting with a fresh Ubuntu with nothing on it
  • Ubuntu version used is 16.04 LTS
  • We are going to use a development framework such as Truffle to help us in quickly testing our smart contract
  • We are not going to connect to either the live or test 'morden' Ethereum network instead we are going to run a test environment locally, this is done via the ethereumjs-testrpc
  • Ubuntu server in my case is a t2.medium server 2 cpu with 4GB RAM at least 

Prerequisites

- NodeJS 6

Execute the following commands :


sudo apt-get install python-software-properties
$ curl -sL https://deb.nodesource.com/setup_6.x | sudo -E bash -
sudo apt-get install -y nodejs
sudo apt-get -y install build-essential


-Install GIT:
sudo apt-get -y install git

- Install truffle:
sudo npm install -g truffle

- Install euthereumjs-testrpc:
sudo npm install -g ethereumjs-testrpc


Starting Test Ethereum Node

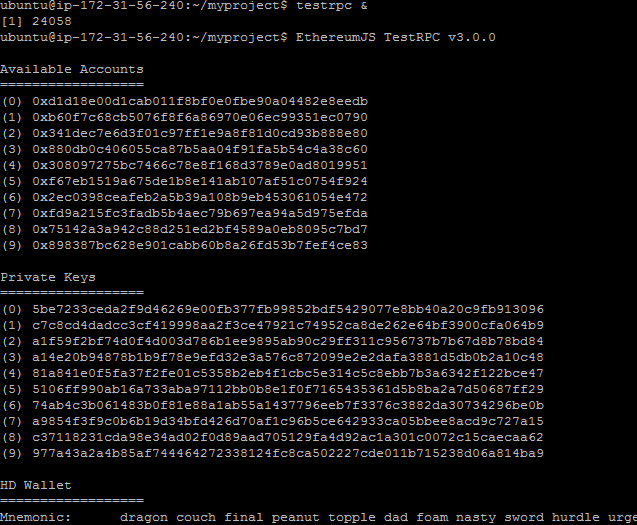
Assuming all the installs above were executed without any issues , the first thing to do is fire up your test rpc server using the following command :

testrpc

This should output something like this:


Truffle Workspace

Now lets follow the example from the truffle website on getting started  :

1. Create a directory myproject : mkdir myproject 
2. cd to the directory : cd myproject
3. Execute the truffle initialisation command : truffle init

This will generate a number of truffle files to ease our development to check the official documentation to stay up to date with more extensive information around what each folder and each file does .

However we are concerned at the moment only with the contracts and this would be in the contracts folder where you will see the following files:
ConvertLib.sol  MetaCoin.sol  Migrations.sol


The MetaCoin.sol is the main contract , it imports the ConvertLib.sol library and the Migrations.sol tells truffle how the contracts needs to be deployed. Feel free to open them to have a look.


Adding our own contrats 

Now in that same directory we are going to add 2 new sol files for a very simple dummy hello world type application  ( contract name and file name needs to be exactly the same ) :

-------Contents of Mortal.sol----------

pragma solidity ^0.4.4;
contract Mortal{

    address public owner;

    function mortal(){
        owner = msg.sender;
    }

    function kill(){
        suicide(owner);
    }
}

-----------------


Then another sol file


-----User.sol-----------------

pragma solidity ^0.4.4;
import "Mortal.sol";

contract User is Mortal{

        string public userName;
        string public ourName;

        function User(){

          userName= "Javed";
        }

        function hello() constant returns(string){
        return "Hello There !";
    }

        function getUserName() constant returns(string){
        return userName;
    }
}
-----------------------------------

If you want to know what these files are doing along with syntax i suggest that you follow this great video from one  awesome guy that allowed me to get started quite quickly here are his videos you should watch ( subscribe to his channel ) :


In our case we modified his example such as we get something we can very quickly run and see what happens :) !!

Also in his example he uses the Ethereum wallet but this was a very process for me as the wallet keep synching for a very long time and not even sure if its working fine as well , so better start with a test env . with testrpc .

Truffle Compile

Now go on the console and run the compile command  : 

truffle compile

This will compile your contracts in bytecode .


Truffle Migrate

Now lets move the compiled contracts to test env. ethereum node that is testrcp :

truffle migrate

You should see something like in the left window :


Truffle Build

Now you can build a dapp ( distributed application ) using truffle , i wont go in the details of this as you will find more information from the main documentation page and i am only going to get you started quickly.

Command is well :

truffle build


Truffle Console


Truffle comes with a console that allows you to tap directly into your deployed contract so what you want to do is fire up the console using the command :

truffle console 

Try to execute the following commands :

User.deployed();

User.deployed().userName.call();

User.deployed().hello.call();


You should be able to retrieve values from public property userName and execute function hello.


Conclusion

We managed to :
1. Setup an ubuntu server with all the tools we need to start developping dapps ( nodejs , truffle , ethereumjs-testrpc )
2. We managed to learn about the development framework truffle how to use it
3. We created , compiled and deployed a simple dummy contract to the testrpc node
4. We managed to even call the contract 


Monday, October 24, 2016

First Steps with Blockchain

Blockchain can be very confusing to start with so I will be documenting my findings on my blog such as to keep a trace of how to set it up and get started creating decentralized apps also known as dapp .

I have purchased a book which is really interesting and that explains where we are currently as far as cytocurrencies are (e.g BitCoin , ether , litecoin ) but also the history behind blockchain. The book is called Decentralized Applications written by Siraj Raval . I really appreciated the way that the author explained the concepts in a simple but yet extensive manner , only problem I got was that when I came to chapter 3 where the author basically references open source github project to create a dapp that basically mimics twitter , the github urls are all broken hence the application example is really hard to follow.

Now currently trying to make the hello world application for Ethereum work , steps have been explained on this blog post although running a contract seems to be churning out all kind of errors:

Monday, September 19, 2016

Installing mvnw on Ubuntu

Typically when working with jhipster applications there is are mvnw commands that needs to be executed.

The mvnw tool which is wrapper on top of maven needs to be installed by following the example set at https://github.com/vdemeester/mvnw .

First need to checkout the tool :
git clone git://github.com/vdemeester/mvnw.git ~/.mvnw

Then you need to add the following environment variable within .bashrc:


nano ~/.bashrc

Command:
export PATH="$HOME/.mvnw/bin:$PATH"

then enable it :
. ~/.bashrc


Install Maven 3.3.9 on ubuntu

The following commands needs to be adapted based on the version of Maven you want to install , the latest version can be found on Maven download page .

This article assumes that you are installing on Ubuntu the version 3.3.9 of maven ( currently latest version as am writing entry ):

wget http://apache.mirrors.lucidnetworks.net/maven/maven-3/3.3.9/binaries/apache-maven-3.3.9-bin.tar.gz

sudo mkdir -p /usr/local/apache-maven

sudo mv apache-maven-3.3.9-bin.tar.gz /usr/local/apache-maven

cd /usr/local/apache-maven

sudo tar -xzvf apache-maven-3.3.9-bin.tar.gz

Once this is done add to you environment variables by editing .bashrc:

nano ~/.bashrc

export M2_HOME=/usr/local/apache-maven/apache-maven-3.3.9
export M2=$M2_HOME/bin
export MAVEN_OPTS="-Xms256m -Xmx512m"
export PATH=$M2:$PATH

then apply it by executing :
. ~/.bashrc


Sunday, August 21, 2016

Skytravel Agency

One of my friends recently opened up a travel agency in Mauritius called SkyTime , they have excellent rates and wonderful ideas for your next trip. So if you want to book your next vacations abroad do not hesitate to at least get a quote from these wonderful people who are passionate about their jobs.

Right now they are running some interesting promotions on trips to Kuala Lumpur , Singapore and Bangkok , don't miss these awesome deals !


Airfare Promo to Singapore/Kuala Lumpur ***Rs 17,800***
4 Nights in Kuala Lumpur (3 star hotel) ***Rs 24,000***
4 Nights in Kuala Lumpur (4 star hotel) ***Rs 26,000***
4 Nights in KL, 2 Nights in Singapore ***Rs 31,500***
3N in KL, 2N in Singapore, 3N in Bangkok ***Rs 45,000***
3N in KL, 2N in Singapore, 3N in Bali ***Rs 43,500***

Sunday, August 07, 2016

Apollo Chennai Hospital

Recently I had to take one of my parents to Apollo Hospital in Chennai. I thought that given the number of people that go there from Mauritius ( or other parts of the World) that there would be plenty of information but to my surprise neither did Doctors in Mauritius have enough information around what were the procedures nor were there are lot of material or resources that explained how to get there. So I told myself that once am back from Chennai I will bring up a blog entry to help people in Mauritius and else where such as at least they know what to expect when they get to the Apollo Hospital.


I need to already make you aware that am neither working for Apollo nor have medical expertise it is just my own personal experience which am relating in this post so do take this into consideration please.

Note also that there are many Apollo hospitals in Chennai which specialise in terms of :

1. Cancer
2. Pregnancy
3. Heart & Lungs
4. etc...

I went to the main Hospital on Greams Lane which is a more general type of Hospital so the pictures and details will relate to this hospital although the other hospitals are pretty close by.


Pre-Requisites

Before going to Chennai you need to make sure that you have the following :

  1. Already contacted Apollo Hospitals we used to contact via the email address:  apollohospitals.india@gmail.com  and their website address is  chennai.apollohospitals.com 
  2. You need to have already scanned all your medical reports and sent to the representative of the International Patients Division 
  3. They usually respond either the same day or the very next day , I also received a phone call once I had my phone number within my email signature
  4. In parallel check properly with local Doctor  whether the patient actually needs to be treated abroad, this is very important else you will just spend a lot of money for nothing when you could have had the treatment or part of the treatment within your own country 
  5. Get approval and a written report summary of the condition of the patient from your local doctor and approval that the patient is fit to travel and that he/she should seek medical treatment abroad . 
  6. You need to then get the appropriate Medical visa for the patient and the attendees , this is normally a fast enough process , you can get it within 3-5 days in Mauritius , you will probably be asked to fill an online visa form ( https://indianvisaonline.gov.in/visa/index.html )
  7. Once you get the approval and report from your Local Doctor and your medical visa you can now tell Apollo around your trip so you will need to choose your room type ( Private rooms are comfy enough ) and when to pick you up at the airport.
  8. When asking for pickup from Apollo do mention the number of passengers and lugage such as the right type of taxi can come pick you up that is either a car or SUV

Travel to Chennai

Going to Chennai involves taking a flight from Mauritius , thankfully there a direct flights at the time of writing of the article :

  1.  A flight on Monday's to Chennai from Mauritius with a technical stop at Bengalaru ( you stay in the plane for 1 hour in Bengalaru then you travel to Chennai )
  2. A flight back to Mauritius every Tuesdays  from Chennai
  3. Fastest flight would be around 6 hours something


The picture above gives you an idea in terms of flight from Air Mauritius as well as costs although there are also flights from Emirates but which are more costly.

Be careful when booking your flights because there are flights which involve transit in Mumbai or Delhi with some lengthy transit times . Depending on the state of the patient I would recommend to choose the direct flight and plan well in advance ( if possible ).

In my case we took business class because of the extra room space but mind you that does increase the cost of the travel a lot .

I always take Atom Travels for my business trips so I asked them to book for my parents and myself for this medical trip , Henna from Atom was very helpful and quickly sorted out all issues in terms of flight bookings for us . So if your in Mauritius try Atom Travels for your booking , they are a responsive and very professional travels agency.

Wheel Chair

If you need a wheel chair please make sure that you have it as a remark within your Ticket and do ask for one at the departure counter in Mauritius when your check-in.

Normally a staff will come with a wheel chair and breeze you through all the queues and counters rapidly such as you can board your plain with minimal issues.

Basically your like a VIP if your going with somebody in a wheel chair, so do expect some stares from other passengers as why on earth you have passed in front of them in queques and check points.


Money


  1. Before travelling already ask for the approximate cost of the treatment for which you are going with Apollo , they will provide you with indicative cost range in USD
  2. Max out as much as possible your credit cards 
  3. Ensure you have some amount of money with you in USD
  4. Try to enable your e-banking account such as you can make transfers from the internet directly
  5. Inform your bank that you will be outside of the country from what date to what date such as they allow the processing of your transactions whilst being abroad
  6. Install a currency convertor on your phone , this is always very useful
Note that within my stay in Chennai I have used my SBM debit card without any issues so I didn't end up using my credit card at all but as a safe precaution do bring your credit card as I had issues in a past trip to India where Debit cards were not working only Credit cards worked.


Lodging in Apollo - In Patient

Typically at least one medical attendant can stay with the patient depending on the room type selected , the "Private rooms" are one type of Apollo rooms which are good enough with a :
  1. Bed for the patient ( typical hospital beds )
  2. A cot for one medical attendant
  3. A TV screen with lots of Indian serials
  4. A private bathroom/washroom
  5. Air conditioning
There is also option of deluxe rooms but unless you can afford it for the X number of days you are staying in Chennai , I would advise to go with Private rooms .

Note that if Private rooms are not within your budget there are also other types of shared rooms but given how overall clean the hospital is , it is safe to take them if your short on budget.

Lodging outside Apollo - Out Patient

If your planning to be an Out Patient or if your a medical attendant that stayed outside of the hospital ( which is my case ) then I would recommend the Ibis Chennai City Center which is on Anna Salai main road and 10 mins from the Hospital via rickshaw .


  1. The hotel has opened its door since start of 2016 so its quite new at the point of writing of this blog . 
  2. The service is very good and the staff were exceptionally helpful towards all the demands I had .
  3. The WIFI is decent enough but dont expect awesome connection speeds here
  4. The Buffet at Rs800 INR was absolutely great with a mix of different south indian dishes which I wouldn't have discovered on my own along with Biryani every single night
  5. Room prices were at Rs 4, 200 INR  per night .
  6. There is also a small Gym on the 11th floor 
Note all prices are subject to change so you need to contact them. 

I liked the hotel so much that I even wrote a review for them on  Trip Advisor .

There are also a number of different hotels in the vicinity of the hospital but being accustomed with the Ibis ( Accor Group ) of hotels I decided to go with this one.

Do check on tripadvisor if you want to have other type of lodgings the book either directly with the hotel or though travel agency.


Arrival in Chennai 

On arrival in Chennai usually you will get a person which can help you out if you have a wheelchair patient and which will take you and your patient through counters and checkpoints quite quickly. 

The airport itself in Chennai is a small one if you compare with the one in Delhi for example.

When you go out of the airport building if you asked for pickup you will find an Apollo representative at an Apollo (mini) counter which will direct you to your taxi .

Travel from Airport to the Apollo hospital is between 30 to 45 mins depending on the traffic , if you take the direct flight from Mauritius then you would land in the early morning around 7am and then the traffic is still not that dense.

Chennai surprisingly is cleaner than Gurgaon in Delhi for example and you wont find too many dusts although it does stink at some places. But for me I didnt find this very problematic and got accustomed quiet quickly.


Weirdly enough I found it quite similar to some places in Mauritius and having been in india before I guess already was helpful . So expect buildings really close to each other , lots or rickshaws , people horning , lots of motorbikes .


The picture above shows the front the Apollo main hospital at Greams Lane off Greams road. It is a kinda of attractive location so not really gloomy as most hospitals are .


Once you go past the gates then you need to head to the Sindoori Block , this is where the international patients need to register themselves. This Sindoori Block also has a small Bistrot restaurant ,although food is not that great , your better off buying food outside.


Now depending at what time you arrive there do expect that you will have some wait time as the staff only officially start working at around 9am . In our case we have to wait for another 2 hours before the guys reponsible to come and take our application .

However once that is done then the rest is quite fast , the photo below shows the Internation Patient service within the Sindoori Block. You can ask if you can get a SIM Card already at that place , people will make arrangements . Do try to  go for AirTel though .


You will be provided with badges for medical patient and attendants . These badges have a yellow landyard to them that allows the attendants to come in and out of the hospital at anytime. So it is important to keep it with you as without this a medical attendant will not be able to come and go as he pleases.

The actual patients are housed in the Main Block building which is just after the Sindoori Block and you will be taken there once registration over.


Below is the entrance of the Main Block where there are stretchers and wheelchairs to take people in or out of the hospital. What is nice is that you will find a lot of attendants ( well dressed and mannered ) that you can talk to you should you need advice and some even hand out sanitiser gel to wash your hands , which i cannot stress how important is to keep yourself clean in Chennai , Mauritius or wherever you are.


Rooms are after you go through main lobby and you will find a pharmacy ( which is always packed) on your left.


You will need to go through this checkpoint , to get to elevators to rooms. Note that the guards will let you past during normal visiting hours but should the visitor hours be over then without a badge you will not get very far .. trust me.


The lifts are operated by lift boys and they are the sole rulers who decide who has the biggest priority of taking the lifts due to urgency or criticality of patient but they are typically ok. Try taking the side lifts as they are smaller and have less chances of being suddenly evacuated for a strecher or wheel chair voyage. 


Treatment

The moment you step in your room you will get a battery of doctors ,nurses ( sisters ) and other room service staff coming to see the patient all through the day.

First thing that you need to do is ask to see your doctor and provide a verbal description of the illness as well as provide the full medical history and records of the patient to the doctor. Typically the doctor will want to hear the attendants , the patient and spend quite some time looking at the results to make his own opinion.

Then the doctor can advise on to the next set of procedures and what other specialized doctors need to consult the patient.


What is nice is that :
  1. The patient is constantly being checked in terms of medicine that needs to be taken or blood samples that needs to be taken
  2. Doctors usually come at a predefined time  , you can ask to them as many questions as you might have and discuss about your concerns , they typically provide as much information as possible
  3. Apollo Hospital has all facilities to do blood tests , image scans , MRI , etc.. within the same building or in Apollo hospitals nearby so you 
  4. All reports are either received the same day or the next day which is not something possible for all analysis in Mauritius , so you save in terms of time
  5. A nutritionist is assigned to the patient that comes almost daily to check what the patient should be eating as advised by the doctor
  6. The room and wash room are kept very clean by the cleaners
  7. there is also WIFI in the hospital which you can use to consult mails or use WhatsApp .
  8. Nurses are very patient and friendly , at least the ones we had to deal with
  9. There are representatives of the hospital that check Quality Assurance in terms of service which is being offered and constant try to get feedback whether positive or negative
  10. You can order food for the attendant directly to your room


Some points which might have been interesting would have been :
  1. Better WIFI connection because at times it wasn't that great and WIFI is important to keep in contact with folks back home
  2. Time to order food for attendants is very fixed past 12:30 
  3. Faster checkout procedure for preparing bill
  4. Stairways to the attendants instead of relying on elevators that most of the time are crowded
  5. European / American channels in the Private rooms
  6. Better air conditioning in the rooms , ours had a problem with changing the temperature
  7. Mosquito nets  for the patient 

Overall the Apollo hospital feels very professional and operating like clock work .


Billing

Some important facts in regards to Billing :


  1. You need to provide a deposit at the start of the treatment 
  2. You can regularly monitor the expenses by calling the billing department , the number is available next to the phone
  3. You can pay for expenses all throughout the day the service runs 24/7
  4. There are two offices for paying the biggest one runs 24/7 and is next to Sindoori Block , and there is a second smaller / faster office which is on the main block itself
  5. Doctor expenses are available only on checkout day
  6. It takes half a day for preparing the full expense bill including doctor expense
  7. The SBM debit card works for payment
  8. Apollo also takes foreign currency , so you can pay in USD dollars.


Here I must say I was a bit disappointed because we had to wait a long time to get our final bill although we mentioned well in advance that we wanted to have everything settled asap when we went to the big billing department we also had a very unpleasant staff talking to us but his other colleagues were much more courteous


Transport in Chennai


  • There is a rickshaw stand in front of the main gate as you can see below . If you want to go anywhere always keep a copy of the address on piece of paper or as a photo explain to them where you wanna go and if they don't understand ask to call the place where you need to head to . For example in once instance they didnt understand where the IBIS hotel was located so they called and got the directions.


  • You also have the excellent option of using OLA cabs , but for that you need to get an Indian SIM card. Once you have that and data on the card then all you need is to register on either the Android or iOS version of the app , enable your GPS and book a cab to take you to your destination. It is a very efficient service if you are scared taking the rickshaw.


Departure 

Once you have settled your hospital bills , you are now ready to head back home . You will need to order a cab through Apollo Hospital or you can order your own. I prefered taking a 4 hour package costing around Rs1600 INR with the Ibis and then went to pickup the patient and attendants .

If you need wheelchair they will provide you at the hospital and then once you arrive at the airport which is between 30-45 mins depending on traffic you will see a lot of phone booths near the airport departure terminal , it will have a list of all airlines and which ones you need to call to get a wheelchair. Person that will bring the wheelchair will stay with you until you board.


The picture below shows the different airlines which serve Chennai airport at the Terminal 4 which is the international departure terminal .


Do not expect a lot from inside the terminal once you passed the very serious military guards that will do all kind of excessive checks . The terminal seems old and not well kept , it is really nothing compared to Delhi's luxurious airport terminal .

Business lounge is also not great at all and seems more like a cafeteria.

So once this is done all you need is wait for your flight and fly back home!


Conclusion

Although Chennai to many of us sounds like a distant , unknown place it is actually quite clean and pleasant . The people tend to understand English words and if you can speak some hindi it is always useful . The treatment at the Apollo Hospital is very good and you get quality service for the money your paying.

For whichever reason your planning to go for treatment in Chennai I wish you all the best , keep faith and always be positive !
Tuesday, April 12, 2016

MySQL setup on Ubuntu 14.04

Thankfully for us installation of mysql on ubuntu 14.04 is pretty straightforward:


- First do an update :

sudo apt-get update

- Then execute the install :
sudo apt-get install mysql-server

You will be prompted to enter at some point the password , so do that on the screen.

You can check whether the service is running using the following command :
sudo netstat -tap | grep mysql

To create a database or execute any command you need to access mysql prompt and provide password:
mysql -u root -p


Source:
https://www.digitalocean.com/community/tutorials/a-basic-mysql-tutorial
https://help.ubuntu.com/lts/serverguide/mysql.html

Friday, April 08, 2016

Tomcat 8 Docker install on Ubuntu 14.04

Below are the steps for installing Tomcat 8 within a Docker container on Ubuntu 14 , in my case on Amazon Ec2.

Docker Install

You need to first follow the instructions for setting up docker :
https://docs.docker.com/engine/installation/linux/ubuntulinux/


Tomcat Install

- identify your Ubuntu instance in my case I wanted to run it with JDK 8 so first navigate to Docker Hub :

https://hub.docker.com/_/tomcat/

- Then choose the correct docker image version :


So this is going to be version 8.0.33-jre8

- Login to your ubuntu
- Execute the following command

sudo docker run -it --rm -p 8080:8080 tomcat:8.0.33-jre8

This will download the Tomcat 8 with JDK 8 image and start it on port 8080 .

You will be able to access your tomcat instance http://public_id_address:8080

Docker Commands

- To check which docker containers are running execute the command

sudo docker ps

You should see something like this:

CONTAINER ID        IMAGE                COMMAND             CREATED             STATUS              PORTS                    NAMES
40586996cebe        tomcat:8.0.33-jre8   "catalina.sh run"   31 minutes ago      Up 31 minutes       0.0.0.0:8080->8080/tcp   jolly_almeida


- To stop the docker container choose the docker container id , which you find when doing docker ps :

sudo docker stop 40586996cebe

- To restart the tomcat conatiner re-execute:

sudo docker run -it --rm -p 8080:8080 tomcat:8.0.33-jre8