Sunday, March 04, 2018

Object Detection Labelling image and generating tfRecord

I made use of the tutorial from jackyle  to label my images . Note that pythonprogramming has also the exact same tutorial :) !

Mind you the hardest part is really finding the images , the rest goes more or less pretty fast.

Basically you use the tool labelImage to help in the labelling , which basically creates an XML file for each of the image that you label .

I used the windows binary which can be found here and did all the labelling from windows itself.

Your directory structure should be like this under ROOT_DIR/models/research/object_detection:

|-xml_to_csv.py
|-data
|-images
   |- train
   |- test


Once you have labelled all your images you need to do the following :

1. Place 70 % of your images + xml in a folder images/train
2. Place 30% of your images + xml in a folder images/test
3. Create a xml_to_csv.py file that looks like below:


==========xml_to_csv.py====================
import os
import glob
import pandas as pd
import xml.etree.ElementTree as ET


def xml_to_csv(path):
    xml_list = []
    for xml_file in glob.glob(path + '/*.xml'):
        tree = ET.parse(xml_file)
        root = tree.getroot()
        for member in root.findall('object'):
            value = (root.find('filename').text,
                     int(root.find('size')[0].text),
                     int(root.find('size')[1].text),
                     member[0].text,
                     int(member[4][0].text),
                     int(member[4][1].text),
                     int(member[4][2].text),
                     int(member[4][3].text)
                     )
            xml_list.append(value)
    column_name = ['filename', 'width', 'height', 'class', 'xmin', 'ymin', 'xmax', 'ymax']
    xml_df = pd.DataFrame(xml_list, columns=column_name)
    return xml_df


def main():
    for directory in ['train','test']:
        image_path = os.path.join(os.getcwd(), 'images/{}'.format(directory))
        xml_df = xml_to_csv(image_path)
        xml_df.to_csv('data/{}_labels.csv'.format(directory), index=None)
        print('Successfully converted xml to csv.')


main()


========================================

4. Excecute  python xml_to_csv.py , this will read all the xml files and create 2 csv files in the data directory train_labels.csv and test_labels.csv

Docker Container

If you installed tensorflow using docker container  ( check my tutorial ) and cloned the following repository ( install git if you dont already have it ):

git clone https://github.com/tensorflow/models.git 

You can copy a zip of the images folder , images.zip , and the python xml_to_csv.py into the container, tensorflow,  using :

docker cp xml_to_csv.py tensorflow:/notebooks/models/research/object_detection/

docker cp images.zip tensorflow:/notebooks/models/research/object_detection/

Now all you need to do is to unzip the images ( install unzip if you dont already have it) :

unzip images.zip


Then you connect to the running instance of the container using :

docker exec -it tensorflow /bin/bash

and execute :


python xml_to_csv.py


Generating TfRecord

Now the next step is based on the generated test_labels.csv and train_labels.csv we are going to create tensorflow record files for each .

1. Copy the following generate_tfrecord.py file into your /notebooks/models/research/object_detection/   directory:

=========generate_tfrecord.py=========================================

"""
Usage:
  # From tensorflow/models/
  # Create train data:
  python generate_tfrecord.py --csv_input=data/train_labels.csv  --output_path=data/train.record --images_path=images/train

  # Create test data:
  python generate_tfrecord.py --csv_input=data/test_labels.csv  --output_path=data/test.record --images_path=images/test
"""
from __future__ import division
from __future__ import print_function
from __future__ import absolute_import

import os
import io
import pandas as pd
import tensorflow as tf

from PIL import Image
from object_detection.utils import dataset_util
from collections import namedtuple, OrderedDict

flags = tf.app.flags
flags.DEFINE_string('csv_input', '', 'Path to the CSV input')
flags.DEFINE_string('output_path', '', 'Path to output TFRecord')
flags.DEFINE_string('images_path', '', 'Path to Images')
FLAGS = flags.FLAGS


# TO-DO replace this with label map
def class_text_to_int(row_label):
    if row_label == 'cocacola':
        return 1
    else:
        None


def split(df, group):
    data = namedtuple('data', ['filename', 'object'])
    gb = df.groupby(group)
    return [data(filename, gb.get_group(x)) for filename, x in zip(gb.groups.keys(), gb.groups)]


def create_tf_example(group, path):
    with tf.gfile.GFile(os.path.join(path, '{}'.format(group.filename)), 'rb') as fid:
        encoded_jpg = fid.read()
    encoded_jpg_io = io.BytesIO(encoded_jpg)
    image = Image.open(encoded_jpg_io)
    width, height = image.size

    filename = group.filename.encode('utf8')
    image_format = b'jpg'
    xmins = []
    xmaxs = []
    ymins = []
    ymaxs = []
    classes_text = []
    classes = []

    for index, row in group.object.iterrows():
        xmins.append(row['xmin'] / width)
        xmaxs.append(row['xmax'] / width)
        ymins.append(row['ymin'] / height)
        ymaxs.append(row['ymax'] / height)
        classes_text.append(row['class'].encode('utf8'))
        classes.append(class_text_to_int(row['class']))

    tf_example = tf.train.Example(features=tf.train.Features(feature={
        'image/height': dataset_util.int64_feature(height),
        'image/width': dataset_util.int64_feature(width),
        'image/filename': dataset_util.bytes_feature(filename),
        'image/source_id': dataset_util.bytes_feature(filename),
        'image/encoded': dataset_util.bytes_feature(encoded_jpg),
        'image/format': dataset_util.bytes_feature(image_format),
        'image/object/bbox/xmin': dataset_util.float_list_feature(xmins),
        'image/object/bbox/xmax': dataset_util.float_list_feature(xmaxs),
        'image/object/bbox/ymin': dataset_util.float_list_feature(ymins),
        'image/object/bbox/ymax': dataset_util.float_list_feature(ymaxs),
        'image/object/class/text': dataset_util.bytes_list_feature(classes_text),
        'image/object/class/label': dataset_util.int64_list_feature(classes),
    }))
    return tf_example


def main(_):
    writer = tf.python_io.TFRecordWriter(FLAGS.output_path)
    path = os.path.join(os.getcwd(), FLAGS.images_path)
    examples = pd.read_csv(FLAGS.csv_input)
    grouped = split(examples, 'filename')
    for group in grouped:
        tf_example = create_tf_example(group, path)
        writer.write(tf_example.SerializeToString())

    writer.close()
    output_path = os.path.join(os.getcwd(), FLAGS.output_path)
    print('Successfully created the TFRecords: {}'.format(output_path))


if __name__ == '__main__':

    tf.app.run()


===================================================================


Note that its the same file that is mentioned in the jackyle  tutorial however I kept getting file not found exceptions as it was trying to get the image from the images directory directly instead of images/test or images/train. So I made some modifications such as the images directory for train and test could be passed as a flag.

2. Execute for following command to make sure Python is on your path:

cd /notebooks/models/research/
export PYTHONPATH=$PYTHONPATH:`pwd`:`pwd`/slim
cd object_detection


3. Then create the train record:

python generate_tfrecord.py --csv_input=data/train_labels.csv  --output_path=data/train.record --images_path=images/train

4. Create the test record :

python generate_tfrecord.py --csv_input=data/test_labels.csv  --output_path=data/test.record --images_path=images/test


You should now have 2 files train.record and test.record under the /notebooks/models/research/object_detection/data   directory.

Monday, February 26, 2018

Object Detection Tensorflow

To get started with object detection have a look at the following jupyter notebook:


Assuming that you have already setup your environment with tensorflow , in my case its  a docker container . You need to still execute the following instructions .

One issue i was getting was that the jupyter notebook kept failing at the following line  despite having followed all the instructions:

from object_detection.utils import ops as utils_ops


So i discovered that this was due to Python libraries not being availabe in PYTHONPATH:

# From tensorflow/models/research/
export PYTHONPATH=$PYTHONPATH:`pwd`:`pwd`/slim

if despite having executed the above in your container or your tensorflow environment the problem still persists in your Jupyter notebook consider adding it directly as can be seen below :


====Extract Jupyter Notebook=============================
import numpy as np
import os
import six.moves.urllib as urllib
import sys
import tarfile
import tensorflow as tf
import zipfile
from timeit import default_timer as timer
import cv2

sys.path.append('/notebooks/models/research') # point to your tensorflow dir
sys.path.append('/notebooks/models/research/slim') # point ot your slim dir

from collections import defaultdict
from io import StringIO
from matplotlib import pyplot as plt
from PIL import Image
from object_detection.utils import ops as utils_ops

if tf.__version__ < '1.4.0':
  raise ImportError('Please upgrade your tensorflow installation to v1.4.* or later!')

============================================================


Note that I have also changed the default method to use opencv for faster image IO and a timer to determine performance.

You install opencv using :
sudo apt-get install python-opencv


==============Extract ========================
for image_path in TEST_IMAGE_PATHS:
  start = timer()

  #image = Image.open(image_path)
  image = cv2.imread(image_path)
 
  # the array based representation of the image will be used later in order to prepare the
  # result image with boxes and labels on it.

  #image_np = load_image_into_numpy_array(image)
  image_np = cv2.cvtColor(image, cv2.COLOR_RGB2BGR)
 
  # Expand dimensions since the model expects images to have shape: [1, None, None, 3]
  #image_np_expanded = np.expand_dims(image_np, axis=0)
  image_np_expanded = np.expand_dims(image_np, axis=0)

  # Actual detection.
  output_dict = run_inference_for_single_image(image_np, detection_graph)
  # Visualization of the results of a detection.
  vis_util.visualize_boxes_and_labels_on_image_array(
      image_np,
      output_dict['detection_boxes'],
      output_dict['detection_classes'],
      output_dict['detection_scores'],
      category_index,
      instance_masks=output_dict.get('detection_masks'),
      use_normalized_coordinates=True,
      line_thickness=8)
  plt.figure(figsize=IMAGE_SIZE)
  plt.imshow(image_np)
  end = timer()
  duration = (end - start)

  print('Image: {0} took {1} to be processed'.format(image_path,duration))


===========================================


Tuesday, February 20, 2018

Installing an SSL certificate for NGinx on Ubuntu

Never thought that it would be that easy with a tool called Letsencrypt but basically if you want to add SSL certificate on your Nginx server all you have to do is follow the instructions here that is :


- Update / Install the following packages:
$ sudo apt-get update
$ sudo apt-get install software-properties-common
$ sudo add-apt-repository ppa:certbot/certbot
$ sudo apt-get update
$ sudo apt-get install python-certbot-nginx 
then you ask certbot to install :
sudo certbot --nginx
Note: You will be asked for a domain name , ip addresses will not be allowed

Also certificates need to be renewed , cerbot can take care of that according to documentation

Friday, February 16, 2018

TensorFlow running in Docker deployed on Ubuntu

This entry will provide a view of the different steps required to setup TensorFlow on a Ubuntu environment by running it within a docker container .

Whether your starting off on Machine learning with TensorFlow or your a veteran and you want to setup an infra with a docker container running Tensorflow then this article is for you


Update (17/3/2018): For doing the setup using GPU instances on AWS check my article here 


Why we want to use docker ?

  • We do not want to have our configurations for Tensorflow being messed up by other python versions and configs for other applications so we are isolating it
  • Installing from Docker image is very practical and saves us a lot of time so we can focus directly on the our coding 


Prerequisites :

1. Ubuntu VM , am using one with 8Gb RAM , 100Gb SSD
2. Ubuntu CE installed , follow this link 
3. Make sure you have TCP access to 8888, 9000 if running on AWS ( or other cloud platforms )

Once docker has been installed do make sure that non-root users can also execute the docker command by following instructions from docker site .

Running Tensorflow Container

At time of writing the current version of tensorflow is 1.5 so kick start just execute the following command which is document here .


docker run -it -p 8888:8888 gcr.io/tensorflow/tensorflow


Note that there will be some output when the docker container runs with a token url please copy paste and keep somewhere .

Using Tensorflow

When launching the run command for the TensorFlow docker container above  a url with a token looking something like this would be shown on your console:
http://your_ip_adddress:8888/?token=eXXXXXXXXXXXXXXXXXXXXXXXXX

Use this url directly to login to your jupyter notebook.

Now this is great but we need to also create a volume such as we can easily access files for example pulled from a git repository .

So you might want to remove the docker container that you just started in the last step and use docker-compose file below

Docker compose

Docker compose needs to be installed using the following instructions .

Here is a simple docker-compose file to be able to run the command to run a Tensorflow :

------------docker-compose-tensorflow.yml--------------------------------------

version: '3'
services:
  tensorflow:
    build: .
    image: gcr.io/tensorflow/tensorflow
    container_name: tensorflow
    volumes:
    - notebooks:/notebooks
    ports:
    - "8888:8888"
    - "6006:6006"
    environment:
    - IMAGE_SIZE=224
    - ARCHITECTURE=mobilenet_0.50_224
 
volumes:
  notebooks:


-----------------------------------------------------------------------------------------

The command then to start the container is simple

docker-compose -f  docker-compose-tensorflow up 

and to stop the container :

docker-compose -f  docker-compose-tensorflow down

Note that the docker-compose file contains a port mapping for 6006 which is used for Tensorboard and a volume mapping  to  notebooks .

The volume notebooks ensure that you persist your notebooks on subsequent up - down cycles of your container . Else you would lose all your contents on each shutdown of the container.


Managing containers 

The best way I have found to manage by containers in a practical manner is through Portainer and you can install this on docker using the following command ( site here):

$docker volume create portainer_data
$docker run -d -p 9000:9000 -v /var/run/docker.sock:/var/run/docker.sock -v portainer_data:/data portainer/portainer

Now login to http://your_ip_adddress:9000/ to set a password for admin


Container shell access 

If you want to connect to your running container's shell and assuming that this is called tensorflow as in our case just do :

docker exec -it tensorflow /bin/bash 

Else you can also use Portainer as explained below .

Accessing Tensorflow

You should be able to log onto your docker containers directly through Portainer by clicking on the container name and clicking on console and the click connect on bash


This by default will give you access to /notebook directory :


I found it particularly useful to use this feature of portainer as it meant that directly from portainer web app you could access the bash of your running container .

Also keeping files under /notebook allows you to view them through your jupyter notebook instance.


Reverse Proxy (optional step)

Although not absolutely required I find it useful to be able to access to the tools all directly from port 80 you can install a reverse proxy in front of the Portainer and Tensorflow Jupyter notebook by installing nginx .

Installation is pretty straight forward please check instructions here  :

  • sudo apt-get update
  • sudo apt-get install nginx

Now assuming you are using the default ports as mentioned above (else modify as required ) you need to create a file with a *.conf  e.g myreveseproxysettings.conf  (or whatever suits you) , then you sudo cp (copy) this file to directory /etc/nginx/conf.d  

Not that nginx main config includes configurations files which have a *.conf extension within the /etc/nginx/conf.d directory .

Remember to change My_IP_ADDRESS_OR_DOMAIN_NAME with your IP Address or Domain name .

==================myreveseproxysettings.conf=============================


 server {
        listen       80;
        listen       [::]:80;
        server_name  My_IP_ADDRESS_OR_DOMAIN_NAME;
        # root         /usr/share/nginx/html;

        proxy_set_header Host $http_host;
        proxy_set_header X-Real-IP $remote_addr;
        proxy_set_header X-Forwarded-For $proxy_add_x_forwarded_for;


location /portainer/ {
            proxy_http_version 1.1;

            proxy_set_header Upgrade $http_upgrade;
            proxy_set_header Connection "upgrade";

            proxy_pass "http://localhost:9000/";     
        }

        location / {
            proxy_pass "http://localhost:8888/";
            proxy_set_header X-Forwarded-For $proxy_add_x_forwarded_for;
    proxy_set_header X-Real-IP $remote_addr;
    proxy_set_header Host $http_host;
    proxy_http_version 1.1;
    proxy_redirect off;
    proxy_buffering off;
    proxy_set_header Upgrade $http_upgrade;
    proxy_set_header Connection "upgrade";
    proxy_read_timeout 86400;
        }

        error_page 404 /404.html;
            location = /40x.html {
        }

        error_page 500 502 503 504 /50x.html;
            location = /50x.html {
        }
    }


=================================================

Following commands are useful:

1. Start nginx

sudo systemctl start nginx

2. Stop nginx

sudo systemctl stop nginx

3. Check status nginx

systemctl status nginx


To get out of the status message just do a " :" followed by a "q"

Wednesday, January 03, 2018

Generation of project using JHipster-UML

Just found out that now this command needs to be used to generate using JHipster-UML:
yo jhipster:import-jdl yourUMLFile.jh

where yourUMLFile.jh   is the file containing the JHipster UML definitions.

Once genrated then start the app using mvnw

Thursday, November 23, 2017

Environment setup scikit-learn on Windows

Currently starting to tinker with scikit-learn for Machine learning , i found it a bit confusing to know where to start from a Windows perspective given I didn't have much knowledge around python .

So what you should be doing to get started setting up your environment ( at least whats working for me ) is to install Anaconda 3.x whilst choosing the 64 or 32 bit depending on your environment:

https://www.anaconda.com/download/

The installation is pretty much straight forward from there .

You will also need to have installed GIT:

https://git-scm.com/download/win

Open up the Anaconda prompt and execute the command to install scikit

conda install -c anaconda scikit-learn 

refer to : https://anaconda.org/anaconda/scikit-learn

Thursday, February 23, 2017

Amazon Lex Speech Permissions

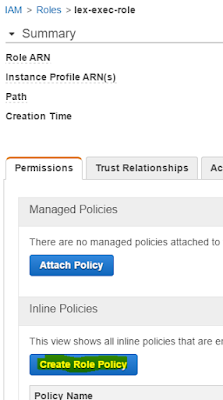
If you are planning to include speech recognition features in your Amazon Lex enabled chatbot you should add a specific policy to the role against which you are executing your command .

Basically you need to give rights to Amazon Polly to your specific role .


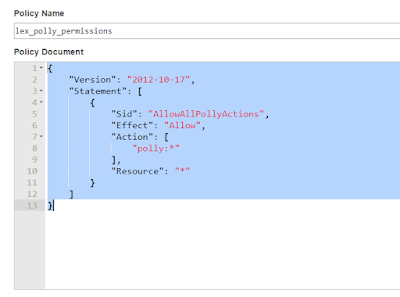
The screenshot below shows what you need to add.


Content:

{
    "Version": "2012-10-17",
    "Statement": [
        {
            "Sid": "AllowAllPollyActions",
            "Effect": "Allow",
            "Action": [
                "polly:*"
            ],
            "Resource": "*"
        }
    ]
}

Wednesday, January 11, 2017

ElasticSearch , Logstash , Kibana and Filebeat with Docker

When you have a number of containers in your DevOps infrastructure running you might need at some point in time to monitor the logs from your container managed apps .

One solution which  works ( at least for me ) is by using ElasticSearch , Logstash , Kibana or also called ELK  , to capture and parse your logs whilst having a tool like Filebeat which actually monitors your logs from Docker containers ( or not ) and send updates across to the ELK server.

I have created a github repository with my solution using ELK + Filebeat and Docker , have a look at the guide around how to setup :
https://github.com/javedgit/Docker-ELK

Monday, January 09, 2017

Install docker in 2 commands on Ubuntu

Simpliest way I found to install docker on ubuntu :

1. wget -qO- https://get.docker.com/ | sh 
2. sudo usermod -aG docker $(whoami)

Then logout and login back to your terminal .

Execute docker ps to see if docker is installed correctly.

Friday, January 06, 2017

Automatic Install of Maven with Jenkins and use within Pipeline

Assume you want a specific version of  Maven to be installed automatically when doing a build e.g because you need to have a build executed on a remote node.

This is what you need to do to perform this :


  • Define your Maven tool within the menu Jenkins > Manage Jenkins > Global Tool Configuration page
    • Click on Maven Installations
      • Specify name for your maven 
      • Specify maven home directory e.g /usr/local/maven-3.2.5
      • Check the Automatic install option
      • Choose Install from Apache e.g maven-3.2.5

  • Make sure that you Jenkins has access to install Maven within your maven home directory by executing the following command (on your slave ):
    • sudo chmod -R ugo+rw /usr/local/maven-3.2.5


  • Now you can use maven in your Jenkins pipeline using a command such as :
withMaven(globalMavenSettingsConfig: 'maven-atlas-global-settings', jdk: 'JDK6', maven: 'M3_3.2.5', mavenLocalRepo: '/home/ubuntu/.m2/repository/') {
   
           sh 'mvn  clean install ' 
            
        }

Note that you can use the Pipeline Syntax helper to fill the options you want to use with Maven .

Thursday, January 05, 2017

Publish Docker Image to Amazon ECR

If you are using an Amazon AWS chances are that you already have ECR , Amazon EC2 Container Registry , within your account . Now this is practical if you want to have you own private Docker Registry for saving your docker images .

Now in my case I wanted to be able to push an image to my private Registry within the context of a Jenkins build .

So we will need to do the following  :

  • Configure AWS credentials on build machine
  • Configure Amazon ECR Docker Registry
  • Modify our Jenkins pipeline to perform a push 


Configure AWS credentials on build machine

1. install the awscli which allows you then to configure your aws account login info on your env , this is done using :

sudo apt install awscli

2. next we do the aws configuration using the following command, ( see AWS CLI official guide  ):

aws configure

Here you will need to know your AWS Access Key ID and AWS Secret Access Key .

Note that the Secret Access Key ID is generated only once , so you need to keep it somewhere safe or regenerate a new one .

To get the 2 keys you would need to login to your AWS console and go to :

IAM > Users > Now select one of the users > Click on Security Credentials tab >  Now from here you can create a New Access Key 


Configure Amazon ECR Docker Registry

1. Login to your AWS console  .
2. Choose "EC2 Container Service"
3. Click on Repositories > Create Repository
4. Set a name for your repository 
5. Clicking on next will give you all the commands to login to ECR from aws cli , tag and push your image to your repo

For reference the official link to ECR is here .


Modify our Jenkins pipeline to perform a push

 Now that we have aws login configured on build machine and a private docker registry on Amazon we are ready to modify our Jenkins pipeline to perform the push .

Here I assume that you already do have Jenkins job existing and you know your way through the pipeline goovy codes .

So we will add the following :

{
....
}
stage('Publish Docker Image to AWS ECR '){
       
        def loginAwsEcrInfo = sh(returnStdout: true, script: 'aws ecr get-login --region us-east-1').trim()
        echo "Retreived AWS Login: ${loginAwsEcrInfo}"
        
        sh '${loginAwsEcrInfo}' 
        sh 'docker tag tomcat6-atlas:latest XXXXXXXXXXXX.YYY.ZZZ.us-east-1.amazonaws.com/tomcat6-atlas:latest'
        sh 'docker push XXXXXXXXXXXX.YYY.ZZZ.us-east-1.amazonaws.com/tomcat6-atlas:latest'
       
   }

Note: Do replace the tag and push command with the actual values as indicated from your Amazon ECR repository page

Notice that I have a loginAwsEcrInfo variable defined in grovy , this is because I need to get the output of the command ' aws ecr get-login --region us-east-1 ' from sh which actually generates the command to login through docker using the aws credentials . This is possible thanks to the returnStdout flag on sh .

That should be it , you should be able to publish your image within your Jenkins job execution .


Wednesday, January 04, 2017

Linking Containers together using --link and Docker Compose

Right now I am working on a project where :
- there is a need for the tomcat instance to connect to an Oracle instance .
-  Both of these run in docker containers
-  I consider the Oracle instance to be a shared docker service , meaning it will be used by other services than the tomcat instance and that I do not want to tear it down as regularly as the tomcat docker instance

I would first need to build an image of my webapp with tomcat6 using a command similar below :

docker build -t tomcat6-atlas .


Then typically i use the following commands to run my docker image for tomcat:

docker run -it --rm --link atlas_oracle12 --name tomcat6-atlas-server -p 8888:8080   tomcat6-atlas

This tells my docker that I want to :

  1.  run an image of tomcat6-atlas as a container 
  2. the alias name of the container should be tomcat6-atlas-server using the --name flag
  3. the port 8080 on the container should be mapped to 8888 on the host using -p flag
  4. and that i should link my atlas_oracle12 container which is already started ( check this blog entry )  to this tomcat6-atlas-server container that am firing using the --link flag . 
The --link flag is important because using this , I can specify for exampled the JDBC connection from my app in the  tomcat6-atlas-server container to point to the atlas_oracle12 container using the alias name directly instead of having to use some ip addresses ( which may change if I restart the oracle container ) .

You could actualy ping the atlas_oracle12 container from the tomcat6-atlas container just by doing ping atlas_oracle12  , you dont need to therefore know the ip address of atlas_oracle12 as long as you name what is the alias name of the container .

Docker Compose 

Now typically the above is great if you have a small project but assume that the tomcat6-atlas container had numerous dependencies with other containers then it the command quickly becomes quite volumetric and possibly error prone.

Here comes Docker Compose which simplifies the build and the run of the container using one yml /yaml file as shown below:


version: '2'
services:
    atlas_tomcat6:
      build: .
      build:
        context: .
        dockerfile: Dockerfile
      image: tomcat6-atlas:latest
      
      network_mode: bridge

      external_links:
        - atlas_oracle12
   
      ports:
        - 8888:8080
      privileged: true
      
This is typically written in a docker-compose.yml file and you need to also install Docker Compose

Important things is that :
  1. It specifies the name of the project as atlas_tomcat6
  2. It assumes that in the same location as the docker-compose.yml file there is a Dockerfile to perform the build
  3. It knows thats the name and tag of the image is 'tomcat6-atlas' and 'latest' respectively
  4. With the network_mode:bridge value it understands that instead of creating a seperate network for the docker compose triggered instance of the container that it needs to use the default network of the host bridge , that is it will be able to connect to atlas_oracle12 ( container which was not started by docker compose )
  5. Containers on which atlas_tomcat6 has a dependency on but triggered seperately are defined with external-links tag e.g atlas_oracle12
  6. ports tag specifies the port mappings
I can build an image for tomcat6-atlas using the command :

docker-compose build


Now all you need to do is to fire up docker-compose using :

docker-compose up

Note that if the previous build command was not executed as part of the up command the image would first be built and then started.

If you want to run this in the bakground then you an use the -d flag :

docker-compose up  -d

To shut down your containers just use :

docker-compose down 

Portainer for visualizing your docker infra

So after having played around with shipyard  I decided to give Portainer a try . The reason why I wanted to look at Portainer as it gives you much more information around your Docker infra than shipyard does.

Below is a screenshot showing the features within shipyard:


You can see that it has information around containers , images , nodes and registries and that pretty much stops there.

In comparison Portainer provides much more level of details :


The thing that interested the most was the Networks section as I was trying to figure out how to connect a docker-compose tiggered container with a shared container which was not launched through docker-compose.

Installation Portainer :

- You need as pre-requiste to have docker and  docker swarm installed
- Official installation instructions are here 
- Then just execute the following command to install the Portainer container ,which will be exposed on port 9000 :

docker run -d -p 9000:9000 portainer/portainer

Note that am assuming that your running on ubuntu /linux

To run portainer on a local instance of the docker engine use the following command :

docker run -d -p 9000:9000  -v /var/run/docker.sock:/var/run/docker.sock portainer/portainer

Endpoints

You an have multiple endpoints configured such as you are monitoring diferent remote instances :
- make sure that inbound ports are opened on your remote endpoints (e.g 2375 )
- if you run Portainer locally to your docker containers , there is a recommended setting to be changed or just provide the public ip addr. of the docker host 

Thursday, December 29, 2016

Install Shipyard to monitor Docker Containers

So far I have a number of containers on my ubuntu box , looked at the easiest way to manage them all and gave shipyard a try .

There are 2 ways to install shipyard both involve (without any surprise) to make use of docker containers.

I have tried the manual install as it gives me more flexibility . The link to the installation is found here . This comes as a number of docker images to run .

The key thing to bear in mind is that wherever you see <IP-OF-HOST> you need to add the actual public ip address of the docker host .

Below are some examples of where the swarm manager and agent ask for the <IP_OF_HOST>

docker run \ -ti \ -d \ --restart=always \ --name shipyard-swarm-manager \ swarm:latest \  manage --host tcp://0.0.0.0:3375 etcd://<IP-OF-HOST>:4001

docker run \ -ti \ -d \ --restart=always \ --name shipyard-swarm-agent \ swarm:latest \  join --addr <ip-of-host>:2375 etcd://<ip-of-host>:4001

Do not put localhost as this IP address else you will not be able to view containers on the docker host .

Also you can configure the port on which your shipyard WEB GUI is accessible by changing the port number below highlighted in yelow i.e 7777

docker run \ -ti \ -d \ --restart=always \ --name shipyard-controller \ --link shipyard-rethinkdb:rethinkdb \ --link shipyard-swarm-manager:swarm \ -p 7777:8080 \ shipyard/shipyard:latest \ server \ -d tcp://swarm:3375

Tuesday, December 27, 2016

Oracle 12c setup using Docker on Ubuntu

Recently had to install Oracle 12c on an ubuntu 16.04 server  , the quickest way I found to do that was through docker .

Pre-requisites

First things first we need to setup docker and this is done by following the docker docs :
 https://docs.docker.com/engine/installation/linux/ubuntulinux/


Installing Oracle Image 

Now that you have a working docker install you need to :

  1. Download the image for Oracle 12c 
  2. Open port 8080 and 1541 such as you get access to the web Application express interface and are able to connect to the Oracle instance via SQLPlus respectively
  3. Map a source directory on your docker host with a directory within the Docker Oracle container should you want to import dumps for example
All the above can be achieved within the command below :
docker run -d -P --name atlas_oracle12 -p 8080:8080 -p 1521:1521  -v /home/ubuntu/atlaslocaldump:/u01/app/oracle/admin/xe/dpdump/ sath89/oracle-12c  

Things to note are that :
  1. atlas_oracle12 - this is the name I have given to my container , it can be any valid name e.g foo 
  2. /home/ubuntu/atlaslocaldump - this directory on my docker host which i want to make visible within the oracle docker container ( so basically the source )
  3. /u01/app/oracle/admin/xe/dpdump/ - this is the directory on the docker container from which i will be able to access the files within /home/ubuntu/atlaslocaldump 
  4. sath89/oracle-12c - this is the name of the image for the Oracle-12c install , you can get more information around this here on docker hub  .
  5. Also it takes around 10-15 mins depending on your machine to initialise the Oracle instance so you might not just be able connect straight to SQLPlus .. give it some time to initialise
SQLPlus

So once the DB is up and running you might want to access the Oracle instance via SQLPlus , to do that you can either install SQLPlus on your docker host and connect or you go within your Oracle container and access the bash , I have done the later as installation of SQLPlus client on Ubuntu was a completely nightmare .

So connect to the oracle container using the following command :
docker exec -it atlas_oracle12 bash 

 Note that atlas_oracle12  is the name of the container that you defined in the docker run command above if this is not the name of the container then change it to reflect your own container name.

Now that we are within the container SQLPlus can be called using :
$ORACLE_HOME/bin/sqlplus system/oracle@//localhost:1521/xe.oracle.docker

Importing a Dump

You can also import a dump using the following command :

$ORACLE_HOME/bin/impdp USERNAME/PASSWORD@//localhost:1521/xe.oracle.docker dumpfile=myDumpFile.dmp  logfile=myLogFile.log table_exists_action=replace schemas=mySchema 
Do change the values above to correspond to your specific settings

Removing the  Oracle Container

For some reasons you might want to remove the oracle container in our case it is named atlas_oracle12 ( change this below to the name you gave your container instance )

To do that you need to stop the contained using command :

docker stop atlas_oracle12

Then remove the container directly using :

docker rm atlas_oracle12

You can check that the container is removed by doing a :

docker ps


Sunday, November 13, 2016

Truffle and Ethereum - call vs transactions

After banging my head for 4 hours trying to figure out why my sample Dapp doesn't actually save (persist) data to my contract I found out that i was actually making a call instead of executing a transaction .

What's the difference between a call and a transaction you say ?

- Well a call is free ( does not cost any gas ) , it is readonly and will return a value
- whilst a transaction costs gas , it usually persists something and does not return anything

Please read the "Making a transaction" and "Making a call" section in the offical lib:
https://truffle.readthedocs.io/en/latest/getting_started/contracts/ 

Say for example in your app.js of your truffle app you have a fictionious setComment and getComment function ( to persist and retrieve comments respectively ) this is how they could look like :

===Extract app.js====================

function setComment(){

 // Assuming your contract is called MyContract
  var meta = MyContract.deployed();

//Taking a comment field from page to save 
  var comment = document.getElementById("comment").value;

// Note that the setComment should exist in your MyContract
  meta.setComment(comment,{from: account}).then(function() {

    setStatus( "Tried to save Comment:" +comment);
  }).catch(function(e) {
    console.log(e);
    setStatus("Error saving comment .. see log."+ e);
  });
}


function getComment(){
  var meta = MyContract.deployed();

 // notice that in the readonly getComment method that after method name a .call is used
// this is what differentiates a call from a transaction
  meta.getComment.call({from: account}).then(function(value) {

    setStatus( "Comment:" +value);
  }).catch(function(e) {
    console.log(e);
    setStatus("Error retrieving comment .. see log."+ e);
  });
}

=============================


Wednesday, November 02, 2016

Ethereum Blockchain Simple Contract Example

This article is about how to get started with creating and deploying a really basic smart contract on the Ethereum network using the Truffle development environment and some solidity scripting .

Solidity is the language in which the contracts are writing its pretty simple enough but lets make some small steps against which then we can build more complex scenarios.

Assumptions :


  • We are deploying to an Ubuntu env. , although the commands could be adapted to whichever environment your using 
  • We are starting with a fresh Ubuntu with nothing on it
  • Ubuntu version used is 16.04 LTS
  • We are going to use a development framework such as Truffle to help us in quickly testing our smart contract
  • We are not going to connect to either the live or test 'morden' Ethereum network instead we are going to run a test environment locally, this is done via the ethereumjs-testrpc
  • Ubuntu server in my case is a t2.medium server 2 cpu with 4GB RAM at least 

Prerequisites

- NodeJS 6

Execute the following commands :


sudo apt-get install python-software-properties
$ curl -sL https://deb.nodesource.com/setup_6.x | sudo -E bash -
sudo apt-get install -y nodejs
sudo apt-get -y install build-essential


-Install GIT:
sudo apt-get -y install git

- Install truffle:
sudo npm install -g truffle

- Install euthereumjs-testrpc:
sudo npm install -g ethereumjs-testrpc


Starting Test Ethereum Node

Assuming all the installs above were executed without any issues , the first thing to do is fire up your test rpc server using the following command :

testrpc

This should output something like this:


Truffle Workspace

Now lets follow the example from the truffle website on getting started  :

1. Create a directory myproject : mkdir myproject 
2. cd to the directory : cd myproject
3. Execute the truffle initialisation command : truffle init

This will generate a number of truffle files to ease our development to check the official documentation to stay up to date with more extensive information around what each folder and each file does .

However we are concerned at the moment only with the contracts and this would be in the contracts folder where you will see the following files:
ConvertLib.sol  MetaCoin.sol  Migrations.sol


The MetaCoin.sol is the main contract , it imports the ConvertLib.sol library and the Migrations.sol tells truffle how the contracts needs to be deployed. Feel free to open them to have a look.


Adding our own contrats 

Now in that same directory we are going to add 2 new sol files for a very simple dummy hello world type application  ( contract name and file name needs to be exactly the same ) :

-------Contents of Mortal.sol----------

pragma solidity ^0.4.4;
contract Mortal{

    address public owner;

    function mortal(){
        owner = msg.sender;
    }

    function kill(){
        suicide(owner);
    }
}

-----------------


Then another sol file


-----User.sol-----------------

pragma solidity ^0.4.4;
import "Mortal.sol";

contract User is Mortal{

        string public userName;
        string public ourName;

        function User(){

          userName= "Javed";
        }

        function hello() constant returns(string){
        return "Hello There !";
    }

        function getUserName() constant returns(string){
        return userName;
    }
}
-----------------------------------

If you want to know what these files are doing along with syntax i suggest that you follow this great video from one  awesome guy that allowed me to get started quite quickly here are his videos you should watch ( subscribe to his channel ) :


In our case we modified his example such as we get something we can very quickly run and see what happens :) !!

Also in his example he uses the Ethereum wallet but this was a very process for me as the wallet keep synching for a very long time and not even sure if its working fine as well , so better start with a test env . with testrpc .

Truffle Compile

Now go on the console and run the compile command  : 

truffle compile

This will compile your contracts in bytecode .


Truffle Migrate

Now lets move the compiled contracts to test env. ethereum node that is testrcp :

truffle migrate

You should see something like in the left window :


Truffle Build

Now you can build a dapp ( distributed application ) using truffle , i wont go in the details of this as you will find more information from the main documentation page and i am only going to get you started quickly.

Command is well :

truffle build


Truffle Console


Truffle comes with a console that allows you to tap directly into your deployed contract so what you want to do is fire up the console using the command :

truffle console 

Try to execute the following commands :

User.deployed();

User.deployed().userName.call();

User.deployed().hello.call();


You should be able to retrieve values from public property userName and execute function hello.


Conclusion

We managed to :
1. Setup an ubuntu server with all the tools we need to start developping dapps ( nodejs , truffle , ethereumjs-testrpc )
2. We managed to learn about the development framework truffle how to use it
3. We created , compiled and deployed a simple dummy contract to the testrpc node
4. We managed to even call the contract 


Monday, October 24, 2016

First Steps with Blockchain

Blockchain can be very confusing to start with so I will be documenting my findings on my blog such as to keep a trace of how to set it up and get started creating decentralized apps also known as dapp .

I have purchased a book which is really interesting and that explains where we are currently as far as cytocurrencies are (e.g BitCoin , ether , litecoin ) but also the history behind blockchain. The book is called Decentralized Applications written by Siraj Raval . I really appreciated the way that the author explained the concepts in a simple but yet extensive manner , only problem I got was that when I came to chapter 3 where the author basically references open source github project to create a dapp that basically mimics twitter , the github urls are all broken hence the application example is really hard to follow.

Now currently trying to make the hello world application for Ethereum work , steps have been explained on this blog post although running a contract seems to be churning out all kind of errors:

Monday, September 19, 2016

Installing mvnw on Ubuntu

Typically when working with jhipster applications there is are mvnw commands that needs to be executed.

The mvnw tool which is wrapper on top of maven needs to be installed by following the example set at https://github.com/vdemeester/mvnw .

First need to checkout the tool :
git clone git://github.com/vdemeester/mvnw.git ~/.mvnw

Then you need to add the following environment variable within .bashrc:


nano ~/.bashrc

Command:
export PATH="$HOME/.mvnw/bin:$PATH"

then enable it :
. ~/.bashrc


Install Maven 3.3.9 on ubuntu

The following commands needs to be adapted based on the version of Maven you want to install , the latest version can be found on Maven download page .

This article assumes that you are installing on Ubuntu the version 3.3.9 of maven ( currently latest version as am writing entry ):

wget http://apache.mirrors.lucidnetworks.net/maven/maven-3/3.3.9/binaries/apache-maven-3.3.9-bin.tar.gz

sudo mkdir -p /usr/local/apache-maven

sudo mv apache-maven-3.3.9-bin.tar.gz /usr/local/apache-maven

cd /usr/local/apache-maven

sudo tar -xzvf apache-maven-3.3.9-bin.tar.gz

Once this is done add to you environment variables by editing .bashrc:

nano ~/.bashrc

export M2_HOME=/usr/local/apache-maven/apache-maven-3.3.9
export M2=$M2_HOME/bin
export MAVEN_OPTS="-Xms256m -Xmx512m"
export PATH=$M2:$PATH

then apply it by executing :
. ~/.bashrc