Thursday, November 23, 2017

Environment setup scikit-learn on Windows

Currently starting to tinker with scikit-learn for Machine learning , i found it a bit confusing to know where to start from a Windows perspective given I didn't have much knowledge around python .

So what you should be doing to get started setting up your environment ( at least whats working for me ) is to install Anaconda 3.x whilst choosing the 64 or 32 bit depending on your environment:

https://www.anaconda.com/download/

The installation is pretty much straight forward from there .

You will also need to have installed GIT:

https://git-scm.com/download/win

Open up the Anaconda prompt and execute the command to install scikit

conda install -c anaconda scikit-learn 

refer to : https://anaconda.org/anaconda/scikit-learn

Thursday, February 23, 2017

Amazon Lex Speech Permissions

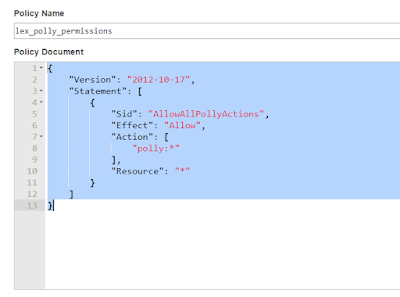
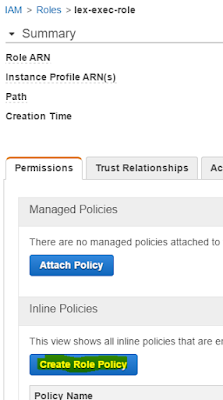
If you are planning to include speech recognition features in your Amazon Lex enabled chatbot you should add a specific policy to the role against which you are executing your command .

Basically you need to give rights to Amazon Polly to your specific role .


The screenshot below shows what you need to add.


Content:

{
    "Version": "2012-10-17",
    "Statement": [
        {
            "Sid": "AllowAllPollyActions",
            "Effect": "Allow",
            "Action": [
                "polly:*"
            ],
            "Resource": "*"
        }
    ]
}

Wednesday, January 11, 2017

ElasticSearch , Logstash , Kibana and Filebeat with Docker

When you have a number of containers in your DevOps infrastructure running you might need at some point in time to monitor the logs from your container managed apps .

One solution which  works ( at least for me ) is by using ElasticSearch , Logstash , Kibana or also called ELK  , to capture and parse your logs whilst having a tool like Filebeat which actually monitors your logs from Docker containers ( or not ) and send updates across to the ELK server.

I have created a github repository with my solution using ELK + Filebeat and Docker , have a look at the guide around how to setup :
https://github.com/javedgit/Docker-ELK

Monday, January 09, 2017

Install docker in 2 commands on Ubuntu

Simpliest way I found to install docker on ubuntu :

1. wget -qO- https://get.docker.com/ | sh 
2. sudo usermod -aG docker $(whoami)

Then logout and login back to your terminal .

Execute docker ps to see if docker is installed correctly.

Friday, January 06, 2017

Automatic Install of Maven with Jenkins and use within Pipeline

Assume you want a specific version of  Maven to be installed automatically when doing a build e.g because you need to have a build executed on a remote node.

This is what you need to do to perform this :


  • Define your Maven tool within the menu Jenkins > Manage Jenkins > Global Tool Configuration page
    • Click on Maven Installations
      • Specify name for your maven 
      • Specify maven home directory e.g /usr/local/maven-3.2.5
      • Check the Automatic install option
      • Choose Install from Apache e.g maven-3.2.5

  • Make sure that you Jenkins has access to install Maven within your maven home directory by executing the following command (on your slave ):
    • sudo chmod -R ugo+rw /usr/local/maven-3.2.5


  • Now you can use maven in your Jenkins pipeline using a command such as :
withMaven(globalMavenSettingsConfig: 'maven-atlas-global-settings', jdk: 'JDK6', maven: 'M3_3.2.5', mavenLocalRepo: '/home/ubuntu/.m2/repository/') {
   
           sh 'mvn  clean install ' 
            
        }

Note that you can use the Pipeline Syntax helper to fill the options you want to use with Maven .

Thursday, January 05, 2017

Publish Docker Image to Amazon ECR

If you are using an Amazon AWS chances are that you already have ECR , Amazon EC2 Container Registry , within your account . Now this is practical if you want to have you own private Docker Registry for saving your docker images .

Now in my case I wanted to be able to push an image to my private Registry within the context of a Jenkins build .

So we will need to do the following  :

  • Configure AWS credentials on build machine
  • Configure Amazon ECR Docker Registry
  • Modify our Jenkins pipeline to perform a push 


Configure AWS credentials on build machine

1. install the awscli which allows you then to configure your aws account login info on your env , this is done using :

sudo apt install awscli

2. next we do the aws configuration using the following command, ( see AWS CLI official guide  ):

aws configure

Here you will need to know your AWS Access Key ID and AWS Secret Access Key .

Note that the Secret Access Key ID is generated only once , so you need to keep it somewhere safe or regenerate a new one .

To get the 2 keys you would need to login to your AWS console and go to :

IAM > Users > Now select one of the users > Click on Security Credentials tab >  Now from here you can create a New Access Key 


Configure Amazon ECR Docker Registry

1. Login to your AWS console  .
2. Choose "EC2 Container Service"
3. Click on Repositories > Create Repository
4. Set a name for your repository 
5. Clicking on next will give you all the commands to login to ECR from aws cli , tag and push your image to your repo

For reference the official link to ECR is here .


Modify our Jenkins pipeline to perform a push

 Now that we have aws login configured on build machine and a private docker registry on Amazon we are ready to modify our Jenkins pipeline to perform the push .

Here I assume that you already do have Jenkins job existing and you know your way through the pipeline goovy codes .

So we will add the following :

{
....
}
stage('Publish Docker Image to AWS ECR '){
       
        def loginAwsEcrInfo = sh(returnStdout: true, script: 'aws ecr get-login --region us-east-1').trim()
        echo "Retreived AWS Login: ${loginAwsEcrInfo}"
        
        sh '${loginAwsEcrInfo}' 
        sh 'docker tag tomcat6-atlas:latest XXXXXXXXXXXX.YYY.ZZZ.us-east-1.amazonaws.com/tomcat6-atlas:latest'
        sh 'docker push XXXXXXXXXXXX.YYY.ZZZ.us-east-1.amazonaws.com/tomcat6-atlas:latest'
       
   }

Note: Do replace the tag and push command with the actual values as indicated from your Amazon ECR repository page

Notice that I have a loginAwsEcrInfo variable defined in grovy , this is because I need to get the output of the command ' aws ecr get-login --region us-east-1 ' from sh which actually generates the command to login through docker using the aws credentials . This is possible thanks to the returnStdout flag on sh .

That should be it , you should be able to publish your image within your Jenkins job execution .


Wednesday, January 04, 2017

Linking Containers together using --link and Docker Compose

Right now I am working on a project where :
- there is a need for the tomcat instance to connect to an Oracle instance .
-  Both of these run in docker containers
-  I consider the Oracle instance to be a shared docker service , meaning it will be used by other services than the tomcat instance and that I do not want to tear it down as regularly as the tomcat docker instance

I would first need to build an image of my webapp with tomcat6 using a command similar below :

docker build -t tomcat6-atlas .


Then typically i use the following commands to run my docker image for tomcat:

docker run -it --rm --link atlas_oracle12 --name tomcat6-atlas-server -p 8888:8080   tomcat6-atlas

This tells my docker that I want to :

  1.  run an image of tomcat6-atlas as a container 
  2. the alias name of the container should be tomcat6-atlas-server using the --name flag
  3. the port 8080 on the container should be mapped to 8888 on the host using -p flag
  4. and that i should link my atlas_oracle12 container which is already started ( check this blog entry )  to this tomcat6-atlas-server container that am firing using the --link flag . 
The --link flag is important because using this , I can specify for exampled the JDBC connection from my app in the  tomcat6-atlas-server container to point to the atlas_oracle12 container using the alias name directly instead of having to use some ip addresses ( which may change if I restart the oracle container ) .

You could actualy ping the atlas_oracle12 container from the tomcat6-atlas container just by doing ping atlas_oracle12  , you dont need to therefore know the ip address of atlas_oracle12 as long as you name what is the alias name of the container .

Docker Compose 

Now typically the above is great if you have a small project but assume that the tomcat6-atlas container had numerous dependencies with other containers then it the command quickly becomes quite volumetric and possibly error prone.

Here comes Docker Compose which simplifies the build and the run of the container using one yml /yaml file as shown below:


version: '2'
services:
    atlas_tomcat6:
      build: .
      build:
        context: .
        dockerfile: Dockerfile
      image: tomcat6-atlas:latest
      
      network_mode: bridge

      external_links:
        - atlas_oracle12
   
      ports:
        - 8888:8080
      privileged: true
      
This is typically written in a docker-compose.yml file and you need to also install Docker Compose

Important things is that :
  1. It specifies the name of the project as atlas_tomcat6
  2. It assumes that in the same location as the docker-compose.yml file there is a Dockerfile to perform the build
  3. It knows thats the name and tag of the image is 'tomcat6-atlas' and 'latest' respectively
  4. With the network_mode:bridge value it understands that instead of creating a seperate network for the docker compose triggered instance of the container that it needs to use the default network of the host bridge , that is it will be able to connect to atlas_oracle12 ( container which was not started by docker compose )
  5. Containers on which atlas_tomcat6 has a dependency on but triggered seperately are defined with external-links tag e.g atlas_oracle12
  6. ports tag specifies the port mappings
I can build an image for tomcat6-atlas using the command :

docker-compose build


Now all you need to do is to fire up docker-compose using :

docker-compose up

Note that if the previous build command was not executed as part of the up command the image would first be built and then started.

If you want to run this in the bakground then you an use the -d flag :

docker-compose up  -d

To shut down your containers just use :

docker-compose down 

Portainer for visualizing your docker infra

So after having played around with shipyard  I decided to give Portainer a try . The reason why I wanted to look at Portainer as it gives you much more information around your Docker infra than shipyard does.

Below is a screenshot showing the features within shipyard:


You can see that it has information around containers , images , nodes and registries and that pretty much stops there.

In comparison Portainer provides much more level of details :


The thing that interested the most was the Networks section as I was trying to figure out how to connect a docker-compose tiggered container with a shared container which was not launched through docker-compose.

Installation Portainer :

- You need as pre-requiste to have docker and  docker swarm installed
- Official installation instructions are here 
- Then just execute the following command to install the Portainer container ,which will be exposed on port 9000 :

docker run -d -p 9000:9000 portainer/portainer

Note that am assuming that your running on ubuntu /linux

To run portainer on a local instance of the docker engine use the following command :

docker run -d -p 9000:9000  -v /var/run/docker.sock:/var/run/docker.sock portainer/portainer

Endpoints

You an have multiple endpoints configured such as you are monitoring diferent remote instances :
- make sure that inbound ports are opened on your remote endpoints (e.g 2375 )
- if you run Portainer locally to your docker containers , there is a recommended setting to be changed or just provide the public ip addr. of the docker host